- Create a local user on your ESXi host.
Note: You cannot perform this task on vCenter Server.
To create a local user on your ESXi host:
- Connect directly to the ESXi host using the vSphere Client.
- Click the Local Users & Groups tab.
- Right-click the window pane and and click Add.
- Enter a login name and a password (user name and UID is generated automatically if you leave the fields blank).
- Create a role and assign permissions:
- Select Home.
- Click Roles and click Add to create a new role with dedicated permissions.
- Define a name for the new role and select the necessary permissions.
- Assign the new role to the user:
- Select Inventory.
- Right-click the Permissions tab and click Add Permission.
- At the left pane, select Add to add the created user.
- At the right pane, select the new created role.
Tag Archives: vmware
How to Convert a Virtual Disk from Thin to Thick
via VMware vSphere 4 – ESX and vCenter Server
Convert a Virtual Disk from Thin to Thick
If you created a virtual disk in the thin format, you can convert it to thick.
The thin provisioned disk starts small and at first, uses just as much storage space as it needs for its initial operations. After having been converted, the virtual disk grows to its full capacity and occupies the entire datastore space provisioned to it during the disk’s creation.
Procedure
1. Select the virtual machine in the inventory.
2. Click the Summary tab and, under Resources, double-click the datastore for the virtual machine to open the Datastore Browser dialog box.
3. Click the virtual machine folder to find the virtual disk file you want to convert. The file has the .vmdk extension.
4.Right-click the virtual disk file and select Inflate.
The virtual disk in thick format occupies the entire datastore space originally provisioned to it.
Extend a logical volume in a virtual machine running Red Hat or Cent OS
Source: Extending a logical volume in a virtual machine running Red Hat or Cent OS (1006371) | VMware KB
By default installation, Linux virtual machine (Fedora, RHEL or CentOS) has two partitions, one for swapping, and the other one is a lv (Logic Volume) partition.
The LVM (Logic Volume Manager) partition mount as /, and cannot be resized by partition tools such as partition magic or gparted.
To extend the logical volume:
Note: These steps only apply to EXT3 file systems.
Caution: VMware recommends to take a complete backup of the virtual machine prior to making these changes.
- Power off the virtual machine.
- Edit the virtual machine settings and extend the virtual disk size. For more information, see Increasing the size of a virtual disk (1004047).
- Power on the virtual machine.
- Identify the device name, which is by default /dev/sda, and confirm the new size by running the command:
# fdisk -l
- Create a new primary partition:
- Run the command:
# fdisk /dev/sda (depending the results of the step 4)
- Press p to print the partition table to identify the number of partitions. By default, there are 2: sda1 and sda2.
- Press n to create a new primary partition.
- Press p for primary.
- Press 3 for the partition number, depending on the output of the partition table print.
- Press Enter two times.
- Press t to change the system’s partition ID.
- Press 3 to select the newly creation partition.
- Type 8e to change the Hex Code of the partition for Linux LVM.
- Press w to write the changes to the partition table.
- Run the command:
- Restart the virtual machine.
- Run this command to verify that the changes were saved to the partition table and that the new partition has an 8e type:
# fdisk -l
- Run this command to convert the new partition to a physical volume:
Note: The number for the sda can change depending on system setup. Use the sda number that was created in step 5.
# pvcreate /dev/sda3
- Run this command to extend the physical volume:
# vgextend VolGroup00 /dev/sda3
Note: To determine which volume group to extend, use the command vgdisplay.
- Run this command to verify how many physical extents are available to the Volume Group:
# vgdisplay VolGroup00 | grep “Free”
- Run the following command to extend the Logical Volume:
# lvextend -L+#G /dev/VolGroup00/LogVol00
Where # is the number of Free space in GB available as per the previous command. Use the full number output from Step 10 including any decimals.
Note: To determine which logical volume to extend, use the command lvdisplay.
- Run the following command to expand the ext3 filesystem online, inside of the Logical Volume:
# ext2online /dev/VolGroup00/LogVol00
Notes:
-
- Use resize2fs instead of ext2online if it is not a Red Hat virtual machine.
- By default, Red Hat and CentOS 7 use the XFS file system you can grow the file system by running the xfs_growfs command.
- Run the following command to verify that the / filesystem has the new space available:
# df -h /
How to manage vmware ESX with PowerShell
- Prerequisites:
- Windows .Net Framework 2.0 (3.5 latest SP Recommended).
- Windows PowerShell (V2 Recommended).
- Install vSphere client.
- Set the ‘Execution Policy’ of PowerShell to Remote Signed.
- Run PowerShell as administrator.
- Set-ExecutionPolicy RemoteSigned
- Type Exit and press Enter to leave the PowerShell prompt.
- Do it on both PowerShell consoles: x86 and x64.
- Download the PowerCLI software to your workstation from the following URL: http://vmware.com/go/PowerCLI
- Run the PowerCLI exe file.
- Install it all the way with default values. Click next until you arrived to finish screen and click finish.
- On your desktop you will now have two icons, which allow you to launch PowerCLI, a 64 bit version and a 32 bit version.
- Copy the PowerCLI modules folder to the PowerShell modules folder:
- C:\Program Files (x86)\VMware\Infrastructure\PowerCLI\Modules -> C:\Windows\System32\WindowsPowerShell\v1.0\Modules
- View the new vmware modules: Get-Module -ListAvailable | ? {$_.name -like “*VMware*”}
- Example
C:\WINDOWS\system32> Get-Module -ListAvailable | ? {$_.name -like “*VMware*”}
Directory: C:\WINDOWS\system32\WindowsPowerShell\v1.0\Modules\PowerCLI\Modules
ModuleType Version Name ExportedCommands
———- ——- —- —————-
Binary 6.0.0.0 VMware.DeployAutomation
Binary 6.0.0.0 VMware.ImageBuilder
Binary 6.5.0.4… VMware.VimAutomation.Cis.Core
Binary 6.5.0.4… VMware.VimAutomation.Cloud
Manifest 6.5.0.4… VMware.VimAutomation.Common
Binary 6.5.0.2… VMware.VimAutomation.Core HookGetViewAutoCompleter
Binary 6.0.0.0 VMware.VimAutomation.HA
Binary 7.0.2.4… VMware.VimAutomation.HorizonView
Binary 6.5.0.4… VMware.VimAutomation.License
Binary 6.5.0.4… VMware.VimAutomation.PCloud
Manifest 6.5.0.4… VMware.VimAutomation.Sdk Get-PSVersion
Binary 6.5.0.4… VMware.VimAutomation.Storage
Binary 6.5.0.4… VMware.VimAutomation.Vds
Binary 6.5.0.4… VMware.VimAutomation.vROps
Binary 6.0.0.0 VMware.VumAutomation
- Import the modules you need: Import-Module -Name VMware.VimAutomation.Core
- The end.
Source: Back to Basics: Part 1 – Installing PowerCLI – VMware PowerCLI Blog – VMware Blogs
https://blogs.vmware.com/PowerCLI/2015/03/powercli-6-0-introducing-powercli-modules.html
how to solve: This product can only be installed on Windows XP SP2 and above when Installing vSphere Client 5.0 on Windows 8.
Symptoms
- Installing vSphere Client 5.0 fails on Windows 8
- You see the error:
This product can only be installed on Windows XP SP2 and above
Resolution
This issue is resolved in vCenter Server 5.0 Update 2, available at VMware Downlaods.
To work around this issue:
- Right-click the VMware-viclient-build number.exe file and click Properties.
- On the Compatibility tab, select Run this program in compatibility mode for: and select Windows 7 from the list.
- Click OK.
- Run the VMware-viclient-build number.exe file.
how to set Static MAC address in VMware – ESX Virtualization
How to maintain a the same MAC address all the time within your vSphere 4 installation. In VMware vSphere 4 environement, when you move your VM to another
Source: Static MAC address set in VMware – ESX Virtualization
How to maintain a the same MAC address all the time within your vSphere 4 installation.
In VMware vSphere 4 environement, when you move your VM to another host or the VM has different path on the same host, the MAC adress of the VM is changed.
If you want to guarantee that the same MAC address is assigned to a given virtual machine every time, even if the virtual machine is moved, or if you want to guarantee a unique MAC address for each virtual machine within a networked environment you have 2 choices. You can do it on the VM configuration level or you can do it on the guest level.
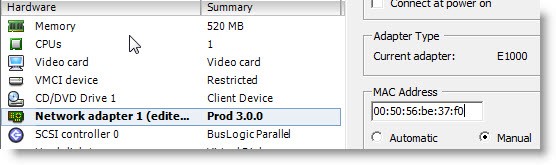
On the VM level you can do it via GUI or by editing your VMX file (just make sure that you unregister the VM from vCenter first, otherwise vCenter will overwrite the value) you go to Menu VM > Edit Settings > Network Adapter and you set the radio button on Manual. Then you can assign a static MAC address there between the authorised range by VMware. The MAC address range is:
00:50:56:00:00:00-00:50:56:3F:FF:FF
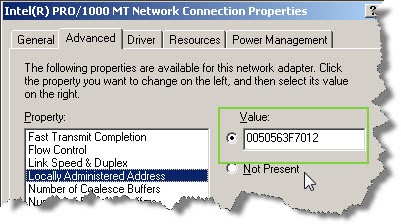
If in some rare cases you need to keep the same MAC as for exaple on your Physical server (for some software license files tightened to a MAC address for exemple), and the MAC adress is outside of the range, you have the possibility to do it inside of your Windows (linux) VM.
On the Windows VM you do it in the properties of your NIC:
Start the VM and in the Windows system go to Control panel > network connections > Properties

Click the Configure button and go to Advanced Tab where on selecting Locally administered value you are able to enter your own value.
And for linux VM you can try this:
ifconfig eth0 down
ifconfig eth0 hw ether xx:xx:xx:xx:xx:xx
ifconfig eth0 up
Disable Virtual Machine Swap File .vswp
For each powered-on virtual machine, a .vswp file is placed in the virtual machines directory on the datastore. This file is required by VMkernel to swap virtual machine memory to the disk in case of excessive overprovisioning. The swap file size can be calculated with the formula (.vswp File = Allocated Memory – Memory Reservation). As per default, the reservation is set to 0, so the .vswp file size is equal to the amount of virtual memory.
Virtual Machine with no Memory Reservation

Having the whole amount of memory from all virtual machines occupying the datastore wastes a lot of capacity. To get rid of the .vswp space, you have to reserve parts or all guest memory. If your virtual machine has 16GB and you reserve 50%, your .vswp file is only 8GB. If you reserve 100%, the file is still there but with a size of 0 bytes. The file will never disappear completely.
Please note that the swap file can only grow while the virtual machine is running. If you want to shrink the file (by increasing memory reservation) you have to power cycle the virtual machine.
Virtual Machine with full Memory Reservation – Reserve all guest memory (All locked)

Since vSphere 5.0, there is also a second vmx .vswp file whose size is about 50-150MB. This is the swap file for overhead memory reserved for the VMX process. You cannot remove that file.
How to Convert VirtualBox VM to VMware VM
- Make sure you do not have any snapshots on your virtual machine; if you do, delete them.
- Open cmd
- Cd C:\Program Files\Oracle\VirtualBox
- vboxmanage clonehd “C:\Users\guy.naftaly \.VirtualBox\HardDisks\HAProxy2.vdi” VMHAProxy2.vmdk -format VMDK -variant standard -type normal –remember
- When the command finishes, you will have your new VMware hard disk on the same location as your original Virtualbox hard disk.
Attaching New VMware Hard Disk to New Virtual Machine
- Upload the vmdk file to your destination data store.
- Open VMware Vsphare client and connect to your destination ESXI server.
- Create new VM and chose existing HD and add the vmdk that you created.
How To Upgrade VMWARE ESXI 5.0.0 To 5.1.0
- Download the update from https://my.vmware.com/group/vmware/patch#search.
- Choose ESXi and Version 5.1.0
- On the next site download the file: ESXi510-201210001.zip
- Upload the zip file to your esxi datastore
- Open your VMware vSphere Client
- Click on your host
- Click on configuration
- Click on storage
- Right click on your datastore
- Select Browser Datastore…
- Select the upload symbol.
- Select upload file
- Select your update-file
- File is uploading…
- When it is uploaded activate your SSH Server to trigger the update.
- Open your VMware vSphere Client
- Click on your host
- Click on configuration
- Click on security Policy.
- Click on properties.
- Activate the SSH server service.
- Start putty and connect to your server. Login with root.
- Depending on where you uploaded your ESXi 5.1.0 update file you need to execute this command to updated your server:
- esxcli software vib install -d /vmfs/volumes/datastore1/ESXi510-201210001.zip
- After a while the result of the update appears:
Installation Result
Message: The update completed successfully, but the system needs to be rebooted for the changes to be effective.
Reboot Required: true
VIBs Installed: VMware_bootbank_ata-pata-amd_0.3.10-3vmw.510.0.0.799733, …snip…
VIBs Removed: VMware_bootbank_ata-pata-amd_0.3.10-3vmw.500.0.0.469512, …snip…
VIBs Skipped:
- As you can see the updated completed successfully.
- Reboot your server with the command reboot.
Sources:
http://www.tinkertry.com/patchesxi50/
http://www.tinkertry.com/windows-8-consumer-preview-on-esxi-5-0-patch-02/
VMware Location of ESXi 5.0 log files
ESXi 5.0 Host Log Files
Logs for an ESXi 5.0 host are grouped according to the source component:
- /var/log/auth.log: ESXi Shell authentication success and failure.
- /var/log/dhclient.log: DHCP client service, including discovery, address lease requests and renewals.
- /var/log/esxupdate.log: ESXi patch and update installation logs.
- /var/log/hostd.log: Host management service logs, including virtual machine and host Task and Events, communication with the vSphere Client and vCenter Server vpxa agent, and SDK connections.
- /var/log/shell.log: ESXi Shell usage logs, including enable/disable and every command entered..
- /var/log/sysboot.log: Early VMkernel startup and module loading.
- /var/log/boot.gz : A compressed file that contains boot log information and can be read using zcat /var/log/boot.gz|more .
- /var/log/syslog.log: Management service initialization, watchdogs, scheduled tasks and DCUI use.
- /var/log/usb.log: USB device arbitration events, such as discovery and pass-through to virtual machines.
- /var/log/vobd.log: VMkernel Observation events, similar to vob.component.event.
Note: For clarification VOB and the corresponding service VOBD propagates kernel level errors to third-party applications. VOBD is a daemon that VMware and third-party applications use for monitoring and troubleshooting.
- /var/log/vmkernel.log: Core VMkernel logs, including device discovery, storage and networking device and driver events, and virtual machine startup.
- /var/log/vmkwarning.log: A summary of Warning and Alert log messages excerpted from the VMkernel logs.
- /var/log/vmksummary.log: A summary of ESXi host startup and shutdown, and an hourly heartbeat with uptime, number of virtual machines running, and service resource consumption.
- Note: For information on sending logs to another location such as a datastore or remote syslog server, see
 Configuring syslog on ESXi 5.0 (2003322).
ESXi 5.1 Host Log Files
Logs for an ESXi 5.1 host are grouped according to the source component:
- /var/log/auth.log: ESXi Shell authentication success and failure.
- /var/log/dhclient.log: DHCP client service, including discovery, address lease requests and renewals.
- /var/log/esxupdate.log: ESXi patch and update installation logs.
- /var/log/lacp.log: Link Aggregation Control Protocol logs.
- /var/log/hostd.log: Host management service logs, including virtual machine and host Task and Events, communication with the vSphere Client and vCenter Server vpxa agent, and SDK connections.
- /var/log/hostd-probe.log: Host management service responsiveness checker.
- /var/log/rhttpproxy.log: HTTP connections proxied on behalf of other ESXi host webservices.
- /var/log/shell.log: ESXi Shell usage logs, including enable/disable and every command entered.
- /var/log/sysboot.log: Early VMkernel startup and module loading.
- /var/log/boot.gz: A compressed file that contains boot log information and can be read using zcat /var/log/boot.gz|more.
- /var/log/syslog.log: Management service initialization, watchdogs, scheduled tasks and DCUI use.
- /var/log/usb.log: USB device arbitration events, such as discovery and pass-through to virtual machines.
- /var/log/vobd.log: VMkernel Observation events, similar to vob.component.event.
- /var/log/vmkernel.log: Core VMkernel logs, including device discovery, storage and networking device and driver events, and virtual machine startup.
- /var/log/vmkwarning.log: A summary of Warning and Alert log messages excerpted from the VMkernel logs.
- /var/log/vmksummary.log: A summary of ESXi host startup and shutdown, and an hourly heartbeat with uptime, number of virtual machines running, and service resource consumption.
- /var/log/Xorg.log: Video acceleration.
Note: For information on sending logs to another location (such as a datastore or remote syslog server), see Configuring syslog on ESXi 5.0 (2003322).
Via: VMware KB: Location of ESXi 5.0 log files.
Via: VMware KB: Location of ESXi 5.1 and 5.5 log files.
