- Create a local user on your ESXi host.
Note: You cannot perform this task on vCenter Server.
To create a local user on your ESXi host:
- Connect directly to the ESXi host using the vSphere Client.
- Click the Local Users & Groups tab.
- Right-click the window pane and and click Add.
- Enter a login name and a password (user name and UID is generated automatically if you leave the fields blank).
- Create a role and assign permissions:
- Select Home.
- Click Roles and click Add to create a new role with dedicated permissions.
- Define a name for the new role and select the necessary permissions.
- Assign the new role to the user:
- Select Inventory.
- Right-click the Permissions tab and click Add Permission.
- At the left pane, select Add to add the created user.
- At the right pane, select the new created role.
Tag Archives: ESX
How to manage vmware ESX with PowerShell
- Prerequisites:
- Windows .Net Framework 2.0 (3.5 latest SP Recommended).
- Windows PowerShell (V2 Recommended).
- Install vSphere client.
- Set the ‘Execution Policy’ of PowerShell to Remote Signed.
- Run PowerShell as administrator.
- Set-ExecutionPolicy RemoteSigned
- Type Exit and press Enter to leave the PowerShell prompt.
- Do it on both PowerShell consoles: x86 and x64.
- Download the PowerCLI software to your workstation from the following URL: http://vmware.com/go/PowerCLI
- Run the PowerCLI exe file.
- Install it all the way with default values. Click next until you arrived to finish screen and click finish.
- On your desktop you will now have two icons, which allow you to launch PowerCLI, a 64 bit version and a 32 bit version.
- Copy the PowerCLI modules folder to the PowerShell modules folder:
- C:\Program Files (x86)\VMware\Infrastructure\PowerCLI\Modules -> C:\Windows\System32\WindowsPowerShell\v1.0\Modules
- View the new vmware modules: Get-Module -ListAvailable | ? {$_.name -like “*VMware*”}
- Example
C:\WINDOWS\system32> Get-Module -ListAvailable | ? {$_.name -like “*VMware*”}
Directory: C:\WINDOWS\system32\WindowsPowerShell\v1.0\Modules\PowerCLI\Modules
ModuleType Version Name ExportedCommands
———- ——- —- —————-
Binary 6.0.0.0 VMware.DeployAutomation
Binary 6.0.0.0 VMware.ImageBuilder
Binary 6.5.0.4… VMware.VimAutomation.Cis.Core
Binary 6.5.0.4… VMware.VimAutomation.Cloud
Manifest 6.5.0.4… VMware.VimAutomation.Common
Binary 6.5.0.2… VMware.VimAutomation.Core HookGetViewAutoCompleter
Binary 6.0.0.0 VMware.VimAutomation.HA
Binary 7.0.2.4… VMware.VimAutomation.HorizonView
Binary 6.5.0.4… VMware.VimAutomation.License
Binary 6.5.0.4… VMware.VimAutomation.PCloud
Manifest 6.5.0.4… VMware.VimAutomation.Sdk Get-PSVersion
Binary 6.5.0.4… VMware.VimAutomation.Storage
Binary 6.5.0.4… VMware.VimAutomation.Vds
Binary 6.5.0.4… VMware.VimAutomation.vROps
Binary 6.0.0.0 VMware.VumAutomation
- Import the modules you need: Import-Module -Name VMware.VimAutomation.Core
- The end.
Source: Back to Basics: Part 1 – Installing PowerCLI – VMware PowerCLI Blog – VMware Blogs
https://blogs.vmware.com/PowerCLI/2015/03/powercli-6-0-introducing-powercli-modules.html
Synchronize ESXi/ESX time with a Microsoft Domain Controller
Synchronize ESXi/ESX time with a Microsoft Domain Controller
When using Active Directory integration in ESXi/ESX 4.1 and newer, it is important to synchronize time between ESXi/ESX and the directory service to facilitate the Kerberos security protocol.
ESXi/ESX support synchronization of time with an external NTPv3 or NTPv4 server compliant with RFC 5905 and RFC 1305. Microsoft Windows 2003 and newer use the W32Time service to synchronize time for windows clients and facilitate the Kerberos v5 protocol. For more information, see the Microsoft Knowledge Base article 939322 and How the Windows Time Service Works.
By default, an unsynced Windows server chooses a 10-second dispersion and adds to the dispersion on each poll interval that it remains in sync. An ESXi/ESX host, by default, does not accept any NTP reply with a root dispersion greater than 1.5 seconds.
Configure Windows NTP Client:
ESXi/ESX requires an accurate time source to synchronize with. To use a Windows 2003 or newer server, it should be configured to get its time from an accurate upstream NTP server
Use the registry editor on the Windows server to make the configuration changes:
Enable NTP mode:
Locate HKEY_LOCAL_MACHINE\SYSTEM\CurrentControlSet\Services\W32Time\Parameters
Set the Type value to NTP.
Enable the NTP Client:
Locate HKEY_LOCAL_MACHINE\SYSTEM\CurrentControlSet\Services\W32Time\Config
Set the AnnounceFlags value to 5.
Specify the upstream NTP servers to sync from:
Locate HKEY_LOCAL_MACHINE\SYSTEM\CurrentControlSet\Services\W32Time\TimeProviders
Set the NtpServer value to a list of at least 3 NTP servers.
Example: You might set the value to:
1.pool.ntp.org,0x1 2.pool.ntp.org,0x1 3.pool.ntp.org,0x1
Note: On a Windows 2008 Domain Controller, NtpServer is located in HKEY_LOCAL_MACHINE\SYSTEM\CurrentControlSet\Services\W32Time\Parameters.
Specify a 15-minute update interval:
Locate HKEY_LOCAL_MACHINE\SYSTEM\CurrentControlSet\Services\W32Time\TimeProviders\NtpClient
Set the SpecialPollInterval value to 900.
Restart the W32time service for the changes to take effect.
Configure ESXi/ESX NTP and Likewise Clients
vSphere Client
Configure ESXi/ESX to synchronize time with the Windows server Active Directory Domain Controller:
- Connect to the ESXi/ESX host or vCenter Server using the vSphere Client.
- Click the ESXi/ESX host in the inventory.
- Click the Configuration tab.
- Under the Software heading, click Time Configuration.
- Click Properties.
- Ensure that the NTP Client Enabled option is selected.
- Click Options.
- Click NTP Settings.
- Click Add and specify the fully qualified domain name or IP address of the Windows server Domain Controller(s).
- Click OK.
- Click OK to save the changes.
vSphere Web Client
- Log in to the vSphere Web Client with administrator credentials.
- Click on Hosts and Clusters.
- Select the ESXi host from the list
- Click Manage > Settings.
- Expand System and select Time Configurations.
- Click Edit.
- Enter the Windows server Domain Controller(s) information.
Additional configuration must be done from the command line.
ESX/ESXi 4.x and 5.x
Open a console to the ESXi/ESX host. For more information, see Connecting to an ESX host using a SSH client (1019852) or Using Tech Support Mode in ESXi 4.1 and ESXi 5.0 (1017910).
Open the /etc/ntp.conf file in a text editor. For more information, see Editing configuration files in VMware ESXi and ESX (1017022).
Add the tos maxdist command on its own line:
tos maxdist 30
Save and close the configuration file.
Make the /etc/likewise/lsassd.conf file writable by running the command:
chmod +w /etc/likewise/lsassd.conf
Open the /etc/likewise/lsassd.conf file in a text editor.
Locate the sync-system-time option, uncomment it, and set the value to no:
sync-system-time = no
Save and close the configuration file.
On ESXi, save the configuration changes to the boot bank so they persist across reboots by running the command:
/sbin/auto-backup.sh
Restart the ntpd and lsassd services for the configuration changes to take effect by running the commands:
service lsassd restart
service ntpd restart
Note: To restart the ntpd and lsassd services on an ESXi host, run these commands:
/etc/init.d/lsassd restart
/etc/init.d/ntpd restart
If the ntpd and lsassd services do not restart, consider restarting the management agents first. For more information about restarting the management agents, see Restarting the Management agents on an ESX or ESXi Server (1003490).
ESXi 6.0
Connect to the ESXi host using an SSH session. For more information, see Using ESXi Shell in ESXi 5.x and 6.0 (2004746).
Open the /etc/ntp.conf file in a text editor. For more information, see Editing configuration files in VMware ESXi and ESX (1017022).
Add the tos maxdist command on its own line:
tos maxdist 30
Save and close the configuration file.
Run this command to access the likewise shell:
/usr/lib/vmware/likewise/bin/lwregshell
Note: If the command fails with the error:
lwregshell (error = 40700 – LWREG_ERROR_NO_SUCH_KEY_OR_VALUE)
Run this command to start the likewise service and then run the command to access the likewise shell:
/etc/init.d/lwsmd start
Navigate to the HKEY_THIS_MACHINE\Services\lsass\Parameters\Providers\ActiveDirectory directory with this command:
cd HKEY_THIS_MACHINE\Services\lsass\Parameters\Providers\ActiveDirectory
Run this command to change the synchronization time:
set_value SyncSystemTime 0
Exit the shell by typing quit and pressing Enter.
Refresh the lsass service with this command:
/usr/lib/vmware/likewise/bin/lwsm refresh lsass
For example:
/usr/lib/vmware/likewise/bin/lwsm refresh lsass
Refreshing service: lsass
To verify the changes to the registry key, run this command:
/usr/lib/vmware/likewise/bin/lwregshell list_values “[HKEY_THIS_MACHINE\Services\lsass\Parameters\Providers\ActiveDirectory]”
Once the configuration changes are complete, ensure that the time is synchronized between the ESXi/ESX host and the Windows server. For more information, see Troubleshooting NTP on ESX and ESXi (1005092).
Source: Synchronizing ESXi/ESX time with a Microsoft Domain Controller (1035833) | VMware KB
Configure ESXi host with Active Directory authentication
Configuring the ESXi host with Active Directory authentication
Purpose
This article provides steps to add an ESXi host to the Active Directory.
Resolution
To add an ESXi host to the Active Directory:
- Confirm the ESXi host is synchronizing time with the Active Directory Domain controller.
- From the vSphere Client, select the host that you want to add to the Active Directory.
- Click the Configuration tab
- Click the Authentication Services.
- Click the Properties link at the top right pane.
- In the Directory Services Configuration dialog, select the directory service from the dropdown.
- Enter a domain.
- Click Join Domain.
- Enter the user name (in user@domain.com format) and password of a directory service user account that has permissions to join the host to the domain and click OK.
- Click OK to close the Directory Services Configuration dialog box.
- Click the Configuration tab and click Advanced Settings.
- Navigate to Config > HostAgent.
- Change the Config.HostAgent.plugins.hostsvc.esxAdminsGroup setting to match the Administrator group that you want to use in the Active Directory. These settings take affect within a minute and no reboot is required.
Notes:
- If the Config.HostAgent.plugins.hostsvc.esxAdminsGroup setting is changed, ensure to remove any invalid users from the Permissions tab of the ESXi host.
- In ESXi 4.1, the ESX Admins container is hard coded and must be added on the Active Directory side for authentication to work.
Source: Configuring the ESXi host with Active Directory authentication (2075361) | VMware KB
how to solve: This product can only be installed on Windows XP SP2 and above when Installing vSphere Client 5.0 on Windows 8.
Symptoms
- Installing vSphere Client 5.0 fails on Windows 8
- You see the error:
This product can only be installed on Windows XP SP2 and above
Resolution
This issue is resolved in vCenter Server 5.0 Update 2, available at VMware Downlaods.
To work around this issue:
- Right-click the VMware-viclient-build number.exe file and click Properties.
- On the Compatibility tab, select Run this program in compatibility mode for: and select Windows 7 from the list.
- Click OK.
- Run the VMware-viclient-build number.exe file.
how to NIC teaming in ESXi and ESX
NIC teaming in ESXi and ESX
Source: VMware KB: NIC teaming in ESXi and ESX
Purpose
This article provides information on configuring NIC teaming.
A NIC team can share the load of traffic between physical and virtual networks among some or all of its members, as well as provide passive failover in the event of a hardware failure or network outage.
Resolution
https://www.youtube.com/watch?v=Hx9FAo7_H2k
To utilize NIC teaming, two or more network adapters must be uplinked to a virtual switch. The main advantages of NIC teaming are:
- Increased network capacity for the virtual switch hosting the team.
- Passive failover in the event one of the adapters in the team goes down.
Observe these guidelines to choose the correct NIC Teaming policy:
- Route based on the originating port ID: Choose an uplink based on the virtual port where the traffic entered the virtual switch.
- Route based on an IP hash: Choose an uplink based on a hash of the source and destination IP addresses of each packet. For non-IP packets, whatever is at those offsets is used to compute the hash.
- Route based on a source MAC hash: Choose an uplink based on a hash of the source Ethernet.
- Use explicit failover order: Always use the highest order uplink from the list of Active adapters which passes failover detection criteria.
- Route based on physical NIC load (Only available on Distributed Switch): Choose an uplink based on the current loads of physical NICs.
Before you begin :
- The default load balancing policy is Route based on the originating virtual port ID. If the physical switch is using link aggregation,Route based on IP hash load balancing must be used. For more information, see Host requirements for link aggregation for ESX and ESXi (1001938) and the VMware Virtual Networking Concepts guide.
- LACP support has been introduced in vSphere 5.1 on distributed vSwitches and requires additional configuration. For more information, see Enabling or disabling LACP on an Uplink Port Group using the vSphere Web Client (2034277).
- Ensure VLAN and link aggregation protocol (if any) are configured correctly on the physical switch ports.
To configure NIC teaming for standard vSwitch using the vSphere / VMware Infrastructure Client:
- Highlight the host and click the Configuration tab.
- Click the Networking link.
- Click Properties.
- Under the Network Adapters tab, click Add.
- Select the appropriate (unclaimed) network adapter(s) and click Next.
- Ensure that the selected adapter(s) are under Active Adapters.
- Click Next > Finish.
- Under the Ports tab,highlight the name of the port group and click Edit.
- Click the NIC Teaming tab.
- Select the correct Teaming policy under the Load Balancing field.
- Click OK.
To configure NIC teaming for standard vSwitch using the vSphere Web Client:
- Under vCenter Home, click Hosts and Clusters.
- Click on the host.
- Click Manage > Networking > Virtual Switches.
- Click on the vSwitch.
- Click Manage the physical network adapters.
- Select the appropriate (unclaimed) network adapter(s) and use the arrow to move the adapter(s) to Active Adapters.
- Click Edit settings.
- Select the correct Teaming policy under the Load Balancing field.
- Click OK.
how to set Static MAC address in VMware – ESX Virtualization
How to maintain a the same MAC address all the time within your vSphere 4 installation. In VMware vSphere 4 environement, when you move your VM to another
Source: Static MAC address set in VMware – ESX Virtualization
How to maintain a the same MAC address all the time within your vSphere 4 installation.
In VMware vSphere 4 environement, when you move your VM to another host or the VM has different path on the same host, the MAC adress of the VM is changed.
If you want to guarantee that the same MAC address is assigned to a given virtual machine every time, even if the virtual machine is moved, or if you want to guarantee a unique MAC address for each virtual machine within a networked environment you have 2 choices. You can do it on the VM configuration level or you can do it on the guest level.
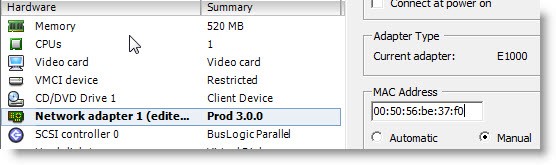
On the VM level you can do it via GUI or by editing your VMX file (just make sure that you unregister the VM from vCenter first, otherwise vCenter will overwrite the value) you go to Menu VM > Edit Settings > Network Adapter and you set the radio button on Manual. Then you can assign a static MAC address there between the authorised range by VMware. The MAC address range is:
00:50:56:00:00:00-00:50:56:3F:FF:FF
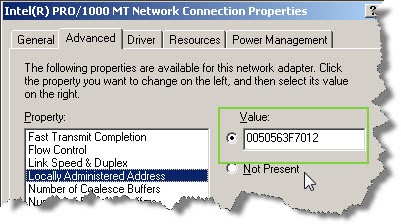
If in some rare cases you need to keep the same MAC as for exaple on your Physical server (for some software license files tightened to a MAC address for exemple), and the MAC adress is outside of the range, you have the possibility to do it inside of your Windows (linux) VM.
On the Windows VM you do it in the properties of your NIC:
Start the VM and in the Windows system go to Control panel > network connections > Properties

Click the Configure button and go to Advanced Tab where on selecting Locally administered value you are able to enter your own value.
And for linux VM you can try this:
ifconfig eth0 down
ifconfig eth0 hw ether xx:xx:xx:xx:xx:xx
ifconfig eth0 up
How to Synchronize ESXi/ESX time with a Microsoft Domain Controller
Symptoms
An ESXi/ESX host configured to use a Microsoft Windows 2003 or newer Domain Controller as a time source never synchronizes its clock with a default configuration.
Resolution
Workaround
If you are using ESXi/ESX 4.1 Update 1 or later, you can use this workaround:
When using Active Directory integration in ESXi/ESX 4.1 and newer, it is important to synchronize time between ESXi/ESX and the directory service to facilitate the Kerberos security protocol.
ESXi/ESX support synchronization of time with an external NTPv3 or NTPv4 server compliant with RFC 5905 and RFC 1305. Microsoft Windows 2003 and newer use the W32Time service to synchronize time for windows clients and facilitate the Kerberos v5 protocol. For more information, see the Microsoft Knowledge Base article 939322 and How the Windows Time Service Works.
By default, an unsynced Windows server chooses a 10-second dispersion and adds to the dispersion on each poll interval that it remains in sync. An ESXi/ESX host, by default, does not accept any NTP reply with a root dispersion greater than 1.5 seconds.
The preceding links were correct as of April 16, 2013. If you find a link is broken, provide feedback and a VMware employee will update the link.
Configure Windows NTP Client
ESXi/ESX requires an accurate time source to synchronize with. To use a Windows 2003 or newer server, it should be configured to get its time from an accurate upstream NTP server. For more information, see the Microsoft Knowledge Base article 816042.
The preceding link was correct as of April 16, 2013. If you find a link is broken, provide feedback and a VMware employee will update the link.
Use the registry editor on the Windows server to make the configuration changes:
Note: This procedure modifies the Windows registry. Before making any registry modifications, ensure that you have a current and valid backup of the registry and the virtual machine. For more information on backing up and restoring the registry, see the Microsoft Knowledge Base article 136393.
- Enable NTP mode:
- Locate HKEY_LOCAL_MACHINE\SYSTEM\CurrentControlSet\Services\W32Time\Parameters
- Set the Type value to NTP.
- Enable the NTP Client:
- Locate HKEY_LOCAL_MACHINE\SYSTEM\CurrentControlSet\Services\W32Time\Config
- Set the AnnounceFlags value to 5.
- Specify the upstream NTP servers to sync from:
- Locate HKEY_LOCAL_MACHINE\SYSTEM\CurrentControlSet\Services\W32Time\TimeProviders
- Set the NtpServer value to a list of at least 3 NTP servers.
Example: You might set the value to:
1.pool.ntp.org,0x1 2.pool.ntp.org,0x1 3.pool.ntp.org,0x1
Note: On a Windows 2008 Domain Controller, NtpServer is located inHKEY_LOCAL_MACHINE\SYSTEM\CurrentControlSet\Services\W32Time\Parameters.
- Specify a 15-minute update interval:
- LocateHKEY_LOCAL_MACHINE\SYSTEM\CurrentControlSet\Services\W32Time\TimeProviders\NtpClient
- Set the SpecialPollInterval value to 900.
- Restart the W32time service for the changes to take effect.
Configure ESXi/ESX NTP and Likewise Clients
vSphere Client
Configure ESXi/ESX to synchronize time with the Windows server Active Directory Domain Controller:
- Connect to the ESXi/ESX host or vCenter Server using the vSphere Client.
- Click the ESXi/ESX host in the inventory.
- Click the Configuration tab.
- Under the Software heading, click Time Configuration.
- Click Properties.
- Ensure that the NTP Client Enabled option is selected.
- Click Options.
- Click NTP Settings.
- Click Add and specify the fully qualified domain name or IP address of the Windows server Domain Controller(s).
- Click OK.
- Click OK to save the changes.
vSphere Web Client
- Log in to the vSphere Web Client with administrator credentials.
- Click on Hosts and Clusters.
- Select the ESXi host from the list
- Click Manage > Settings.
- Expand System and select Time Configurations.
- Click Edit.
- Enter the Windows server Domain Controller(s) information.
Additional configuration must be done from the command line.
ESX/ESXi 4.x and 5.x
- Open a console to the ESXi/ESX host. For more information, see Connecting to an ESX host using a SSH client (1019852) or Using Tech Support Mode in ESXi 4.1 and ESXi 5.0 (1017910).
- Open the /etc/ntp.conf file in a text editor. For more information, see Editing configuration files in VMware ESXi and ESX (1017022).
- Add the tos maxdist command on its own line:
tos maxdist 30
- Save and close the configuration file.
- Make the /etc/likewise/lsassd.conf file writable by running the command:
chmod +w /etc/likewise/lsassd.conf
- Open the /etc/likewise/lsassd.conf file in a text editor. For more information, see Editing configuration files in VMware ESXi and ESX (1017022).
- Locate the sync-system-time option, uncomment it, and set the value to no:
sync-system-time = no
- Save and close the configuration file.
- On ESXi, save the configuration changes to the boot bank so they persist across reboots by running the command:
/sbin/auto-backup.sh
- Restart the ntpd and lsassd services for the configuration changes to take effect by running the commands:
service lsassd restart
service ntpd restartNote: To restart the ntpd and lsassd services on an ESXi host, run these commands:
/etc/init.d/lsassd restart
/etc/init.d/ntpd restart
If the ntpd and lsassd services do not restart, consider restarting the management agents first. For more information about restarting the management agents, see Restarting the Management agents on an ESX or ESXi Server (1003490).
ESXi 6.0
- Connect to the ESXi host using an SSH session. For more information, see Using ESXi Shell in ESXi 5.x and 6.0 (2004746).
- Run this command to access the likewise shell:
/usr/lib/vmware/likewise/bin/lwregshell
Note: If the command fails with the error:
lwregshell (error = 40700 – LWREG_ERROR_NO_SUCH_KEY_OR_VALUE)
Run this command to start the likewise service:
/etc/init.d/lwsmd start
- Navigate to the HKEY_THIS_MACHINE\Services\lsass\Parameters\Providers\ActiveDirectory directory with this command:
cd HKEY_THIS_MACHINE\Services\lsass\Parameters\Providers\ActiveDirectory
- Run this command to change the synchronization time:
set_value SyncSystemTime 0
- Exit the shell by typing quit and pressing Enter.
- Refresh the lsass service with this command:
/usr/lib/vmware/likewise/bin/lwsm refresh lsass
For example:
/usr/lib/vmware/likewise/bin/lwsm refresh lsass
Refreshing service: lsass
- To verify the changes to the registry key, run this command:
/usr/lib/vmware/likewise/bin/lwregshell list_values “[HKEY_THIS_MACHINE\Services\lsass\Parameters\Providers\ActiveDirectory]”
Once the configuration changes are complete, ensure that the time is synchronized between the ESXi/ESX host and the Windows server
VMware ESX,VMware ESXi
Source: VMware KB: Synchronizing ESXi/ESX time with a Microsoft Domain Controller
Disable Virtual Machine Swap File .vswp
For each powered-on virtual machine, a .vswp file is placed in the virtual machines directory on the datastore. This file is required by VMkernel to swap virtual machine memory to the disk in case of excessive overprovisioning. The swap file size can be calculated with the formula (.vswp File = Allocated Memory – Memory Reservation). As per default, the reservation is set to 0, so the .vswp file size is equal to the amount of virtual memory.
Virtual Machine with no Memory Reservation

Having the whole amount of memory from all virtual machines occupying the datastore wastes a lot of capacity. To get rid of the .vswp space, you have to reserve parts or all guest memory. If your virtual machine has 16GB and you reserve 50%, your .vswp file is only 8GB. If you reserve 100%, the file is still there but with a size of 0 bytes. The file will never disappear completely.
Please note that the swap file can only grow while the virtual machine is running. If you want to shrink the file (by increasing memory reservation) you have to power cycle the virtual machine.
Virtual Machine with full Memory Reservation – Reserve all guest memory (All locked)

Since vSphere 5.0, there is also a second vmx .vswp file whose size is about 50-150MB. This is the swap file for overhead memory reserved for the VMX process. You cannot remove that file.
How To Upgrade VMWARE ESXI 5.0.0 To 5.1.0
- Download the update from https://my.vmware.com/group/vmware/patch#search.
- Choose ESXi and Version 5.1.0
- On the next site download the file: ESXi510-201210001.zip
- Upload the zip file to your esxi datastore
- Open your VMware vSphere Client
- Click on your host
- Click on configuration
- Click on storage
- Right click on your datastore
- Select Browser Datastore…
- Select the upload symbol.
- Select upload file
- Select your update-file
- File is uploading…
- When it is uploaded activate your SSH Server to trigger the update.
- Open your VMware vSphere Client
- Click on your host
- Click on configuration
- Click on security Policy.
- Click on properties.
- Activate the SSH server service.
- Start putty and connect to your server. Login with root.
- Depending on where you uploaded your ESXi 5.1.0 update file you need to execute this command to updated your server:
- esxcli software vib install -d /vmfs/volumes/datastore1/ESXi510-201210001.zip
- After a while the result of the update appears:
Installation Result
Message: The update completed successfully, but the system needs to be rebooted for the changes to be effective.
Reboot Required: true
VIBs Installed: VMware_bootbank_ata-pata-amd_0.3.10-3vmw.510.0.0.799733, …snip…
VIBs Removed: VMware_bootbank_ata-pata-amd_0.3.10-3vmw.500.0.0.469512, …snip…
VIBs Skipped:
- As you can see the updated completed successfully.
- Reboot your server with the command reboot.
Sources:
http://www.tinkertry.com/patchesxi50/
http://www.tinkertry.com/windows-8-consumer-preview-on-esxi-5-0-patch-02/
