Tag Archives: Disk

How to Convert a Virtual Disk from Thin to Thick

via VMware vSphere 4 – ESX and vCenter Server

Convert a Virtual Disk from Thin to Thick
If you created a virtual disk in the thin format, you can convert it to thick.
The thin provisioned disk starts small and at first, uses just as much storage space as it needs for its initial operations. After having been converted, the virtual disk grows to its full capacity and occupies the entire datastore space provisioned to it during the disk’s creation.
Procedure

1. Select the virtual machine in the inventory.

2. Click the Summary tab and, under Resources, double-click the datastore for the virtual machine to open the Datastore Browser dialog box.

3. Click the virtual machine folder to find the virtual disk file you want to convert. The file has the .vmdk extension.

4.Right-click the virtual disk file and select Inflate.

The virtual disk in thick format occupies the entire datastore space originally provisioned to it.
Extend a logical volume in a virtual machine running Red Hat or Cent OS

Source: Extending a logical volume in a virtual machine running Red Hat or Cent OS (1006371) | VMware KB

By default installation, Linux virtual machine (Fedora, RHEL or CentOS) has two partitions, one for swapping, and the other one is a lv (Logic Volume) partition.

The LVM (Logic Volume Manager) partition mount as /, and cannot be resized by partition tools such as partition magic or gparted.

To extend the logical volume:

Note: These steps only apply to EXT3 file systems.


Caution: VMware recommends to take a complete backup of the virtual machine prior to making these changes.

  1. Power off the virtual machine.
  2. Edit the virtual machine settings and extend the virtual disk size. For more information, see Increasing the size of a virtual disk (1004047).
  3. Power on the virtual machine.
  4. Identify the device name, which is by default /dev/sda, and confirm the new size by running the command:

    # fdisk -l

  5. Create a new primary partition:
    1. Run the command:

      # fdisk /dev/sda (depending the results of the step 4)

    2. Press p to print the partition table to identify the number of partitions. By default, there are 2: sda1 and sda2.
    3. Press n to create a new primary partition.
    4. Press p for primary.
    5. Press 3 for the partition number, depending on the output of the partition table print.
    6. Press Enter two times.
    7. Press t to change the system’s partition ID.
    8. Press 3 to select the newly creation partition.
    9. Type 8e to change the Hex Code of the partition for Linux LVM.
    10. Press w to write the changes to the partition table.
  6. Restart the virtual machine.
  7. Run this command to verify that the changes were saved to the partition table and that the new partition has an 8e type:

    # fdisk -l

  8. Run this command to convert the new partition to a physical volume:

    Note: The number for the sda can change depending on system setup. Use the sda number that was created in step 5.

    # pvcreate /dev/sda3

  9. Run this command to extend the physical volume:

    # vgextend VolGroup00 /dev/sda3

    Note: To determine which volume group to extend, use the command vgdisplay.

  10. Run this command to verify how many physical extents are available to the Volume Group:

    # vgdisplay VolGroup00 | grep “Free”

  11. Run the following command to extend the Logical Volume:

    # lvextend -L+#G /dev/VolGroup00/LogVol00

    Where # is the number of Free space in GB available as per the previous command. Use the full number output from Step 10 including any decimals.

    Note: To determine which logical volume to extend, use the command lvdisplay.

  12. Run the following command to expand the ext3 filesystem online, inside of the Logical Volume:

    # ext2online /dev/VolGroup00/LogVol00

    Notes:

    • Use resize2fs instead of ext2online if it is not a Red Hat virtual machine.
    • By default, Red Hat and CentOS 7 use the XFS file system you can grow the file system by running the xfs_growfs command.
  1. Run the following command to verify that the / filesystem has the new space available:

    # df -h /

GPT

GPT is Short for GUID Partition Table it defines the layout of the partition table on a hard drive. GPT is meant as a replacement to hard drives using a MBR partition table, which have a 2.20TB size limitation and extends upon UEFI. Using GPT a drive could support between 8 and 9.4 ZB depending on the sector size.

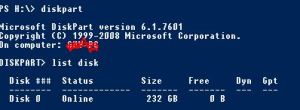
To verify that your disks are formatted as GPT
1. Open CMD
2. Run diskpart
3. Type list disk

GPT