Tag Archives: SSL

How to convert a PFX to a seperate .key/.crt file

In this article I’m going to show you the commands you need to convert your .PFX Certificate file to a seperate certificate and keyfile. This article can come in handy when you need to import your certificates on devices like Cisco routers/loadbalancers etc. where you probably need to import the certificates and keyfiles in plain text (unencrypted). My tool of choice (but there might be others) is OpenSSL for Windows, which can be downloaded here

So after you installed OpenSSL you can start it from it’s Bin folder. I’d like to put OpenSSL\Bin in my path so I can start it from any folder. Fire up a command prompt and cd to the folder that contains your .pfx file. First type the first command to extract the private key:

openssl pkcs12 -in [yourfile.pfx] -nocerts -out [keyfile-encrypted.key]

What this command does is extract the private key from the .pfx file. Once entered you need to type in the importpassword of the .pfx file.  This is the password that you used to protect your keypair when you created your .pfx file.  If you cannot remember it anymore you can just throw your .pfx file away, cause you won’t be able to import it again, anywhere!.  Once you entered the import password OpenSSL requests you to type in another password, twice!. This new password will protect your .key file.

Now let’s extract the certificate:

openssl pkcs12 -in [yourfile.pfx] -clcerts -nokeys -out [certificate.crt]

Just press enter and your certificate appears.

Now as I mentioned in the intro of this article you sometimes need to have an unencrypted .key file to import on some devices.  I probably don’t need to mention that you should be carefully. If you store your unencrypted keypair somewhere on an unsafe location anyone can have a go with it and impersonate for instance a website or a person of your company.  So always be extra careful when it comes to private keys! Just throw the unencrypted keyfile away when you’re done with it, saving just the encrypted one.

The command:

openssl rsa -in [keyfile-encrypted.key] -out [keyfile-decrypted.key]

Again you need to enter an import password. This time you need to enter the new password that you created in step 1.  After that you’re done. You decrypted your private key. In the folder you ran OpenSSL from you’ll find the certifcate (.crt) and the two private keys (encrypted and unencrypted).

Update 07-07-2014:

In some cases you might be forced to convert your private key to PEM format. You can do so with the following command:

openssl rsa -in [keyfile-encrypted.key] -outform PEM -out [keyfile-encrypted-pem.key]

via: https://www.markbrilman.nl/2011/08/howto-convert-a-pfx-to-a-seperate-key-crt-file/
 

Fortigate SSL VPN not working

If the fortigate memory goes too high, and the device drops to conserve mode then the SSL VPN may stop working correctly, or at all.

This is usually happens when the fortigate memory is above 75%.

To solve this:

  1. Run command: diagnose system top 10 or diag sys top 10 or get system performance top. The command will give you the top memory usage processes

For example:

xxxxx # diag sys top 10

Run Time:  121 days, 6 hours and 5 minutes

8U, 91S, 1I; 4031T, 1966F, 148KF

 initXXXXXXXXXXX        1      S       0.0     0.2

         cmdbsvr       38      S       0.0     0.5

(The most left number is the PID and the most right number is the current RAM usage)

  1. If you see among the processes a process name reported or a process name forticron then kill them
  2. To kill those processes run diagnose system kill 9 <pid_int> or diag sys kill 9 <pid_int>
  3. Verify that the fortigate memory usage gone below 75%.
  4. Test connection with VPN.

http://docs-legacy.fortinet.com/fadc/4-1-0/index.html#page/FortiADC_Handbook/looking_for_system_intensive_processes.html

http://pack3tlife.com/2014/08/26/fortinet-restart-ssl-vpn-process/

Installing GoDaddy SSL Certificate in F5 BIG-IP

Installing an SSL Certificate in F5 BIG-IP Load balancer

After your certificate request is approved, you can download your SSL and intermediate certificate from within the SSL application. For more information see Downloading Your SSL Certificate. Both of these files must be installed on your Web server.

You may also download the intermediate certificate from the repository.

NOTE: When downloading your certificate, select Apache as your server type.

To Install SSL Certificates

  1. Launch the F5 BIG-IP Web GUI.
  2. Under Local Traffic, select SSL certificates.
  3. Select the name you assigned to the certificate under General Properties.
  4. Browse to the your_domain_name.crt file that you received from us.
  5. Click Open and then Import.

Enabling Your Intermediate Certificate Using BIG-IP Loadbalancer v.9

  1. In the Web GUI, select Local Traffic, then SSL certificates, and then Import.
  2. Under Import Type, select Certificate, and then Create New.
  3. Enter “GoDaddy” as your certificate name.
  4. Browse to the gd _bundle.crt file that you received from us, click Open, and then click Import.

To Enable Your SSL

  1. Create or open the SSL Profile for the certificate.
  2. Under Configuration, select Advanced.
  3. Select the SSL certificate (public/private key pair) that you installed at the beginning of these instructions.
  4. Under the Chain, browse to the “GoDaddy” (gd_bundle.crt) file that you imported in the previous step, then Save and Exit the configuration.

Using Your SSL Using an Earlier Version of BIG-IP Loadbalancer

  1. Inside of your SSL account, download the primary (your_domain_name.crt) and intermediates bundle ( gd_bundle.crt ) certificate files.
  2. Move your primary and intermediate certificates to the BIG-IP device. This can be done via FTP.
  3. Rename your primary certificate from your_domain_name.crt to your.domain.name.crt and copy it to the /config/bigconfig/ssl.crt/ folder.
  4. Copy the intermediates bundle (gd_bundle.crt ) to the /config/bigconfig/ssl.crt/ folder.
  5. Restart the proxy using these commands:


# bigpipe proxy <IP Address>:443 disable
# bigpipe proxy <IP Address>:443 enable

Via Installing an SSL Certificate in F5 BIG-IP Loadbalancer | GoDaddy Help | GoDaddy Support.

How to fix SSL MITM vulnerability on F5 BIG-IP LTM 9.4.7

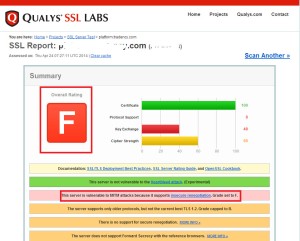
  1. You can test your SSL Server vulnerability on https://www.ssllabs.com/ssltest/index.html.

This free online service performs a deep analysis of the configuration of any SSL web server on the public Internet.

2. Test results for x.x.com can show that it is vulnerable to MITM attacks because it supports insecure renegotiation, effectively allowing an active man-in-the-middle attacker to inject arbitrary content into an encrypted data stream.

This is called also – “plaintext injection” attack or “Project Mogul” issue. A Man in the Middle attack allows an attacker to inject an arbitrary amount of chosen plain text into the application protocol stream data during a secure session renegotiation that uses SSL version 3.x or TLS version 1.x. This may provide an attacker the ability to perform arbitrary actions on affected websites with user’s credentials. This vulnerability does not allow one to decrypt the intercepted network communication. MITM1

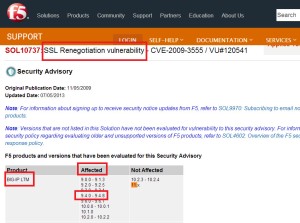
3. You can test which F5 Product and version is affected with SSL Renegotiation vulnerability.

http://support.f5.com/kb/en-us/solutions/public/10000/700/sol10737.html.

In my case BIG-IP LTM 9.4.7 is affected. MITM2

The IETF has adopted as RFC5746: Transport Layer Security (TLS) Renegotiation Indication Extension a new extension to the TLS standard that addresses this issue. F5 Product Development has implemented this new extension beginning in BIG-IP versions 10.2.3 and 11.0.0.

For BIG-IP versions 9.4.x, 9.3.x prior to 9.3.1 HF8, and 10.0.x prior to 10.0.1 HF3:

  1. Take care though to check that your virtual server does _not_ depend on (benign) renegotiations. If you’re not sure, you can use:

bigpipe profile clientssl all show all | grep -e PROFILE -e mid-stream

  1. Apply an iRule similar to the following to each SSL virtual server. The iRule resets the connection if client-side SSL renegotiation is attempted.


when CLIENT_ACCEPTED {
# initialize TLS/SSL handshake count for this connection
set sslhandshakecount 0
}
when CLIENTSSL_HANDSHAKE priority 1 {
# a handshake just occurred
incr sslhandshakecount
# is this the first handshake in this connection?
if { $sslhandshakecount > 1 } {
# log (rate limited) the event (to /var/log/ltm)
log “\[VS [IP::local_addr]:[TCP::local_port] client [IP::remote_addr]:[TCP::remote_port]\]:TLS/SSL renegotiation”
# if not, close the clientside connection
reject
}
}

Links:

SSL Test site

SSL and TLS Authentication Gap vulnerability Explanation 1

SSL and TLS Authentication Gap vulnerability Explanation 2

F5 products and versions that have been evaluated for this Security Advisory

How To Create And Install A Server Certificate From A Stand Alone CA


  1. Open IIS manager
  2. Click on the server name
  3. Double click Server Certificates
  4. On the action panel click create certificate request
  5. On the request certificate window:
  6. Enter common name which can be *company.com.
  7. Enter organization which is the company name.
  8. Enter OU like “IT”.
  9. Enter city location.
  10. Enter state.
  11. Enter country like US or IL (only 2 letters).
  12. On the cryptographic windows leave the defaults which is Microsoft RSA… and 1024 bit length.
  13. On the file name window enter the file name for the “request cert” file and save it.
  14. Click finish.
  15. Go to the CA server.
  16. Go the CA role.
  17. Right click the CA server.
  18. Choose all tasks.
  19. Submit request.
  20. Choose and open the request file that you created before – “wildcard-request.txt”
  21. Now you will find the request pending on the CA server.
  22. Right click the pending certificate.
  23. Choose all tasks.
  24. Choose issue.
  25. After issuing the certificate you will see it under issued certificates.
  26. Right click on the issued certificate.
  27. Choose all tasks.
  28. Choose export binary data.
  29. On the export binary data window mark save binary data to file.
  30. Set a file name .cer and location for the binary file.
  31. This is how the exported certificate look like:
  32. Open IIS manager.
  33. Click on the server name.
  34. Double click on server certificates.
  35. On the action panel click on complete certificate request.
  36. On file name containing the certification… brows to select the server certificate.
  37. Choose a friendly name with * (wildcard) so they can serve all web sites.
  38. Right click on the web site that you want to bind the certificate.
  39. Choose edit binding.
  40. Click add 
  41. Choose type https.
  42. Enter host name the same name as the web site.
  43. Click ok.